The most notable feature in EndBASIC 0.3 is its new full-screen console-based text editor. It took longer than I wanted to start developing this, in part because I was busy moving, and in part because I dreaded the thought of having to unit test the text editor. (Yes, EndBASIC is a personal project and I develop it in my free time, but that doesn’t mean I don’t want it to be properly engineered!)
In the end, I rolled up my sleeves, got to work, and achieved reasonable test coverage. In fact, the tests have already paid off by uncovering various bugs and inefficiencies, so the effort was well-spent. Developing these tests was non-trivial, though, so here is an overview on why it is worthwhile to unit-test a full-screen console app and how to go about it.
The key insight, unsurprisingly, is to design for testability. I knew I wanted to unit-test the text editor from the beginning, so I had to come up with a design that allowed for this. Retrofitting tests into code that never considered testing is very difficult.
As usual, while the specific code I’m going to show you is in Rust, you can easily apply these ideas to your favorite language. All you need is a mechanism to express an abstraction layer between your app and the console manipulation code—and you could do that even in the shell.
Background: escape sequences
Command-line applications typically interact with the console by reading from their standard input (stdin) and writing to their standard output (stdout). Both stdin and stdout are “streams”: you can read from and write to them, but these I/O operations are sequential. The streams do not know anything about where the cursor is or how to change colors or anything like that. And this makes sense because if stdin and stdout are connected to files, what does it mean to “clear the screen”?
If that’s the case, though, how does a console program manipulate the screen to, for example, clear it and position the cursor at an arbitrary location? Well, the answer is that… it depends.
On Unix-like systems, the application writes special collections of bytes, known as escape sequences, to stdout. How the escape sequences look like and what they mean depends completely on what stdout is attached to. Again, if stdout is attached to a file, these sequences mean nothing more than a sequence of bytes. Contrariwise, if stdout is attached to a terminal, then the terminal interprets them and performs certain actions.
The most obvious escape sequence you can think of is the line terminator, or \n. On its own, \n is nothing more than ASCII byte 10. But when the terminal sees this byte, the terminal knows that it has to advance the cursor to the next line and move it to the first column. But the semantics of what \n does vary across systems: Windows interprets \n as just moving the cursor one line down, not rolling it back go the first column.
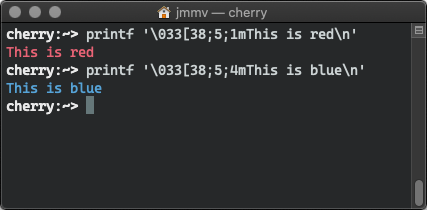
There are more complex escape sequences, of course. This is why you can trivially (assuming you know what terminal type you are talking to) embed escape sequences in printf or echo -e invocations to control how things look like. You essentially use escape sequences as a way to mark up the text:
For completeness, I’ll also mention that the terminal emulator is usually in the kernel, which is what allows you to have full-screen text apps in the text mode console, but it can also be implemented in hardware (where the concept originated), and thus also in user space, which is what graphical programs like xterm used to do before PTYs (and is why they are called terminal emulators).
If you haven’t connected the dots yet, this is precisely what the ancient TERM environment variable is about: it tells the console applications what specific terminal it is talking to so that the application itself can generate the correct escape sequences to control it. Nowadays, the ANSI escape sequences are almost universal, but they weren’t always. terminfo/termcap and (n)curses are libraries to abstract all these details away and offer the programmer a generic console-manipulation interface that works across TERM variants.
This is all about Unix though. On Windows, things are different (and my knowledge is very limited). Command-line applications communicate with the Console Window Host (conhost.exe) by means of ioctl-like calls. In other words: console manipulation happens out of band and isn’t part of what goes into stdout. Or at least that’s the only way it used to be: the new console host supports ANSI escape sequences too, presumably to facilitate interop with WSL.
Anyhow. We don’t care about how the console is updated from a testing perspective: we want to know how the console changes, but not exactly how that’s done by the OS. Therefore, I’m going to refer to the escape sequences and/or the ioctls sent to the console as console manipulation commands or console commands in the text below.
What can we test in a TUI?
Testing a full-screen console app—which some people refer to as a Text User Interface or TUI for short—exposes essentially the same difficulties as testing a GUI:
We are trying to write tests for something that responds to user input, and every user interaction causes changes that are inherently visual and require the human eye for interpretation.
Let’s break these problems down into pieces and see how we can approach them.
First and foremost: we have to ensure that the outcome of our input (key presses) has the right effect on the program state. Given that we are testing a text editor, this is easy: we can populate the editor’s buffer with some text, let the editor process a set of key presses, and then verify that the contents of the editor’s buffer match a golden text. Not very different from other, more traditional tests.
Second, we need to worry about user input. After all, the TUI is interactive and reacts to user key presses, so our tests will have to drive the TUI. This is easier than dealing with the visual console updates, as all we have to do is represent the sequence of key presses to send to the app and then feed those to it in some way. Again, this is not very different from other tests: we have an algorithm and we inject some input.
And third, we have to worry about how things look like, which is the most interesting part of this problem. Because, after all… we can write a test to verify that a piece of code selects the blue color and then clears the screen, but unless we see the result, we don’t know if the screen was all emptied with a blue background or not.
Well, we could. Presumably, we could capture the raw screen contents (or poke at them if we were in the DOS era; 0xB8000 anyone?) and compare those against golden “screenshots” after every key press. This would do the trick and would result in tests that are completely decoupled form the way the screen is updated… which actually sounds like a good idea. The problem with this approach of comparing screen contents is that we would need a terminal emulator to “render” the console from the console commands that the application emits, and a terminal emulator isn’t a trivial piece of software.
The alternative to this idea of comparing screen contents is to capture the console commands that the app emits and compare those to expectations. This is easier to implement but has different fidelity tradeoffs as we shall see below.
What are TUI tests good for?
If we follow the ideas presented above, we will end up with a bunch of tests that inject key presses into the TUI and, for each of them, we will capture which console manipulation commands were emitted and we will compare them against expectations.
Which… sounds fragile and not particularly useful, doesn’t it? As mentioned earlier, a sequence of commands is meaningless unless we humans see the visual results once a terminal emulator has processed the commands. You could then say that these tests are pointless. But these tests provide three separate benefits:
Corner-case and regression validation. In the scenario we are looking at, a lot of the editor behavior is obvious: if we press the right arrow key, we know that the cursor has to move one position to the right if the line of text permits. If we break the way this works, the breakage will be extremely visible once we do any kind of manual test.
But… what happens if the cursor is located in the middle of the last visible line of text, with the viewport scrolled to the right because the line was extremely long, and we press enter to split it? That’s not something you usually do, so what’s the expected behavior there? We need to make sure that, once this works as we intend, it doesn’t unexpectedly break, and we don’t want to have to manually verify this every time we change the editor logic.
Behavior documentation. The collection of test cases for the TUI will serve us as the documentation of all cases we must care about in the code if we are doing any kind of refactoring, for example. As illustrated above, there are a lot of corner cases to deal with, and unless they are tracked somewhere, it’s too easy to forget about them.
Efficiency measures. The last benefit these tests give us is a way to measure efficiency. By capturing the sequence of commands emitted by the TUI logic, we can see if those commands are minimal. Because if they are not, the TUI will flicker.
For example: an easy way to implement the TUI is to refresh the whole screen after every key press—and while that will yield updates that look correct (and that would pass a testing model where we verify screen contents), the app will be doing too much work to update the screen. We need to worry about only doing partial screen updates (clearing a single line, using terminal scrolling features, etc.), and to that end, capturing the sequence of commands lets us do that.
The downside of this testing approach is that, again, we have no visual knowledge of how the screen looks like in the tests. Having the tests is thus insufficient to validate the TUI behavior: if we change the editor code, we will have to manually and visually inspect that our new changes behave accordingly. But the idea is that we will only need to do a minimal check-up for the new behavior once. After that, we can trust that our tests will catch unexpected changes that happen anywhere else.
Let’s get to work by putting these ideas into practice to unit-test the EndBASIC text editor.
Mocking out console input
The first thing we need is an abstraction layer between the editor (the TUI) and the console so that we have a point to hook into I/O operations for testing purposes.
Fortunately, EndBASIC already had one such abstraction, for two reasons: first, because I designed for testability upfront; and, second, because I intentionally wanted to keep the language’s core detached from any console-manipulation specifics (a necessity to support Unix systems, Windows, and the web).
For console input, this abstraction looks like the following:
pub enum Key {
    ArrowUp, ArrowDown, ArrowLeft, ArrowRight,
    Backspace, Enter, Eof,
    Char(char),
    ...
}

pub trait Console {
    ...
    fn read_key(&mut self) -> io::Result<Key>;
    ...
}
We have a Key enumeration to represent key presses at a high level, independent of their key codes. We have a Console trait (think about this as an abstract base class if you aren’t familiar with Rust) to represent console operations in an abstract way. And the Console trait provides a read_key() hook to wait for an individual key press.
Given this interface, our editor implements an event loop based on the return value of Console::read_key() and uses the generic Key representation to process either control operations (e.g. moving the cursor) and edit operations (e.g. actual character insertion).
And given this interface, supplying fake input data to our TUI is trivial. All we need to do is declare a MockConsole implementation with a mock read_key that, for each key press, yields a pre-recorded value taken from a sequence of golden key presses:
struct MockConsole {
    ...
    golden_in: VecDeque<Key>,
    ...
}

impl Console for MockConsole {
    ...
    fn read_key(&mut self) -> io::Result<Key> {
        match self.golden_in.pop_front() {
            Some(ch) => Ok(ch),
            None => Ok(Key::Eof),
        }
    }
    ...
}
Now… you might think that this is overkill given that there already exist console abstraction layers out there. In fact, EndBASIC already uses the crossterm crate to support both Unix and Windows, so presumably this library could offer a way to mock the console for testing. Unfortunately, it doesn’t. And even if it did: I needed my own abstraction to keep the language’s core minimal and detached from heavy libraries; and I needed to bypass crossterm in the web (WASM) context, for which it cannot be built.
Capturing console output
Now that we have put a basic console abstraction in place to read key presses, we can use it to manipulate the console itself too. Let’s extend our Console trait with some of the primitives we need for a TUI:
pub trait Console {
    ...
    fn clear(&mut self) -> io::Result<()>;
    fn locate(&mut self, row: u16, col: u16) -> io::Result<()>;
    fn write(&mut self, bytes: &[u8]) -> io::Result<()>;
    ...
}
Note that these are “high-level” primitives: they tell the console what to do, but the caller doesn’t care about how that happens. The implementation is free to use ANSI codes wherever possible (maybe via crossterm, maybe not) and direct Windows conhost manipulation calls when not.
Or, you know, we can implement a recorder that captures those calls for further validation in our tests and does nothing to the real console:
enum CapturedOut {
    Clear, Locate(u16, u16), Write(Vec<u8>),
    ...
}

struct MockConsole {
    ...
    captured_out: Vec<CapturedOut>,
    ...
}

impl Console for MockConsole {
    ...
    fn clear(&mut self) -> io::Result<()> {
        self.captured_out.push(CapturedOut::Clear);
        Ok(())
    }

    fn locate(&mut self, row: u16, column: u16) -> io::Result<()> {
        self.captured_out.push(CapturedOut::Locate(row, column));
        Ok(())
    }

    fn write(&mut self, bytes: &[u8]) -> io::Result<()> {
        self.captured_out.push(CapturedOut::Write(bytes.to_owned()));
        Ok(())
    }
    ...
}
The MockConsole will now hook into all console commands emitted by the editor and record them in a captured_out array that we can later compare against golden data.
Tying it all together
The last piece to make all of this palatable is to use the builder pattern to simplify expressing the test data. I’ll not follow my previous suggestion to use the builder pattern to define test scenarios to the letter, but we’ll be close enough. The goal is to define our test scenarios in a declarative manner, and also be able to interleave causes (key presses) and effects (console changes) so that it’s easy to reason about what’s going on.
We need two builders:
MockConsoleBuilder: A builder to construct the golden input that theMockConsolecontains. This builder will let us accumulate input via separate calls using whichever representation makes more sense for the data at hand: either withadd_input_chars()to record long sequences of characters without theKey::Charboilerplate or withuse_input_keys()to precisely injectKeyinstances.OutputBuilder: A builder to construct the console commands that we expect theMockConsoleto capture. Similarly, this will let us accumulate “raw”CapturedOutcommands viaadd()and will also provide us with higher-level operations that encapsulate common sequences of commands that the editor emits. For example, it’s very common for the editor to redraw the whole screen or parts of it, so we encapsulate all commands required to do so behindrefresh()andquick_refresh(), respectively.
With these, we are now armed with all necessary knowledge and pieces to put the test cases together.
To illustrate how the tests might look like, I’ve copy/pasted one of the editor tests verbatim and inserted detailed commentary to guide you through what’s going on:
#[test]
fn test_insert_in_empty_file() {
    // Create a builder for the MockConsole and the collection of CapturedOut
    // values we expect.  These two builders let us interleave cause and
    // effect, which makes it easier to understand what's going on.
    let mut cb = MockConsoleBuilder::new().with_size(rowcol(10, 40));
    let mut ob = OutputBuilder::new(rowcol(10, 40));

    // The first thing the editor does once it starts is clear the screen,
    // write a status line, and position the cursor: aka a full screen
    // refresh.  This is a very common operation, so instead of cluttering
    // each test case with the details on how this happens, I abstracted it
    // away behind a refresh helper function that inserts these operations
    // into the OutputBuilder.
    ob = ob.refresh(rowcol(0, 0), &[""], rowcol(0, 0));

    // The editor is now up and running, waiting for key presses.  We inject
    // three different letters and then add expectations for each of them:
    // namely, we want to see the letters appear in the terminal, we want to
    // see the status bar to reflect the new position, and we want the cursor
    // to move to a specific location.  This is a faster version of the
    // full-screen refresh, so I abstracted these sequences away behind
    // quick_refresh.
    cb = cb.add_input_chars("abc");
    ob = ob.add(CapturedOut::Write(b"a".to_vec()));
    ob = ob.quick_refresh(rowcol(0, 1), rowcol(0, 1));
    ob = ob.add(CapturedOut::Write(b"b".to_vec()));
    ob = ob.quick_refresh(rowcol(0, 2), rowcol(0, 2));
    ob = ob.add(CapturedOut::Write(b"c".to_vec()));
    ob = ob.quick_refresh(rowcol(0, 3), rowcol(0, 3));

    // We now have a line of text.  Let's press enter in its two forms and
    // ensure that the cursor and editor state move accordingly two lines down.
    cb = cb.add_input_keys(&[Key::NewLine]);
    ob = ob.quick_refresh(rowcol(1, 0), rowcol(1, 0));
    cb = cb.add_input_keys(&[Key::CarriageReturn]);
    ob = ob.quick_refresh(rowcol(2, 0), rowcol(2, 0));

    // We are at an empty line, so add one final character to it.
    cb = cb.add_input_chars("2");
    ob = ob.add(CapturedOut::Write(b"2".to_vec()));
    ob = ob.quick_refresh(rowcol(2, 1), rowcol(2, 1));

    // Our test scenario is ready.  We now call the run_editor helper which
    // constructs the Editor object and connects it to the MockConsole that
    // can be obtained from cb.build().  run_editor then starts the editor,
    // which will update the MockConsole with commands based on the sequence
    // of keys it gets from it.  Once the editor completes, we do two things:
    // we validate that the raw text contents of the editor match the string
    // we pass below, and we compare the captured commands against what we
    // pre-recorded in ob.
    run_editor("", "abc\n\n2\n", cb, ob);
}
And that’s it. The editor logic is a driver for the mock console, and thus we get full observability on what’s happening to the screen. Remember: this doesn’t tell us that what we see is correct, but a quick manual spot check will tell us that it is. And once we know that the visual behavior is good, enshrining it in code will help us represent tricky corner cases and prevent regressions.
As nice as it sounds, though, these tests do not come for free. Writing this kind of tests is tedious, and updating them is as well. You can go a long way by implementing the Display trait wherever possible and grouping related screen updates behind helper methods (such as quick_refresh above), but even then, understanding what’s wrong when the test fails is hard. I can imagine ways of making this better by allowing the tests to pinpoint where things went wrong, but I haven’t had a need to build that yet.
Needless to say, I’ll take tedious-but-correct-and-useful test cases over zero test cases every day.
Let me conclude by repeating what I mentioned in the introduction: writing these tests has been super-valuable in: uncovering bugs in corner-cases; permitting me to clean up a lot of the original code duplication in the editor with confidence; and uncovering inefficiencies such as the editor issuing full refreshes when it should have been doing quick status updates.
What do you think? Have you seen similar kinds of tests for text console apps? What about graphical apps? Discuss via any of the methods below!


Featured software
Featured posts
- Fast machines, slow machines
- EndBASIC 0.10: Core language, evolved
- Farewell, Microsoft; hello, Snowflake!
- Rust is hard, yes, but does it matter?
- Rust traits and dependency injection
- A year on Windows: Introduction
- Always be quitting
- How does Google keep build times low?
- How does Google avoid clean builds?
- Unit-testing a console app (a text editor)
- More...
